Monday, April 6, 2020

FREE fitted face mask pattern with filter pocket for adults!

FREE EASY ADULT FITTED FACE MASK WITH FILTER POCKET


This post contains a free easy pattern and instructions with photos to make a 2-layer fitted face mask with a filter pocket. It is designed by a nurse to be used both with and without an N95 or surgical mask. Click here for a FREE children's face mask pattern!


**DISCLAIMER: This is NOT a tested medical device, but in light of the recent CDC recommendations to use a bandana or scarf if there is nothing else this may be better than nothing. I make no warranties or claims as to the effectiveness of this mask so proceed at your own risk**

NOTE: I do not believe these masks are equivalent to N95 respirators that can filter out the tiniest of particles, but I do believe that wearing them while sick can help “cover a cough” so to speak or potentially help extend the life of a medical mask when worn over top. The CDC is now recommending everyone wear masks in public. Please reserve the medical masks for healthcare professionals. 

Fitting the mask: The goal of this mask is to create the best seal possible around the nose, up the sides of the cheek, and under the chin, in order to prevent as much unfiltered air as possible from entering any open spaces in the mask. To do this, when putting on the mask make sure it covers the nose- use the metal piece to create a tight seal around the bridge of the nose, then bring the mask under the chin. The sides of the mask should be positioned so that the elastic lays just above and below the ears, reducing pressure on them. 

Materials Needed:  

NOTE: SEAM ALLOWANCE IS 3/8”!


  • TIES OR ELASTIC
    • Fabric Ties: Four pieces of 2”x20” fabric
    • Elastic Ties: (recommended ¼” or 3/8” width)
      • Women (or small/medium head): x1 piece of 13” elastic and x 1 piece 10” elastic 
      • Men (or larger head):  x1 piece of 15” elastic and x1 piece of 12” elastic
  • Fabric for outer piece and lining (FABRIC SUGGESTIONS: Batik or other tightly woven cotton, cotton/polyester woven blends (what scrubs are made from), or optional additional water-resistant breathable fabric for liner (such as Ottertex or Goretex). Preferably two contrasting colors. Wash warm/hot daily and use sanitizing cycle if available. 
  • 6” of twist ties (good), pipe cleaner (better), or flat jewelry wire (best)
  • Optional filter material: 4”x5” piece of 100% polypropylene fabric (cut 5 pieces, label #1-5 and rotate daily- this is because viruses can live on surfaces for several days. Wash daily after use in COLD water with soap and water, and air dry. Can double amount of polypropylene if it doesn’t interfere with breathability.)


PRINTING AND CUTTING:

Note: if you are NOT making a pocket, follow the directions below and simply cut 2 mirrored sets (4 pieces total) of the main piece.

Instructions for cutting using Cricut Design Space: .svg file for using with Cricut can be found here (dropbox file): Cricut SVG file

  1. Create a new project
  2. Click “Upload”, then “upload image”
  3. Select “browse”, then locate file called “Fittedfacemaskwithpocket-Cricut.svg” on hard drive (.svg files work best)
  4. Choose a name for your file and keywords, if desired. Click “Save”
  5. Select your image, and then click “insert images”
  6. THIS STEP IS VERY IMPORTANT. While the entire group is still selected, change the width to exactly 23.250 inches making sure the lock is on to maintain scale. This will resize the cut pieces to the proper height which is EXTREMELY important for the perfect fit. Also, adjust position on x and y axis to 1 to place the grouped images into the viewing field.
  7. You can now delete the optional fabric ties pieces if desired (the lavender rectangles- a 24” mat is required to cut these)
  8. Click “make it”, adjust mat size if needed, then click “continue”.
  9. The pieces are sorted by color according to material. Using your fabric grip mat, follow instructions to cut out the pieces for your main and lining pieces.  
  10. Load your mat, and click the flashing Cricut button.

Instructions for printing and cutting: Pattern is located at the end of this post. If you have trouble downloading the images from the site, they may also be found here (dropbox folder) 

  1. Select images and click, "print". You may alternatively save images to your computer and print from there. 
  2. Make sure your printer properties are set to “actual size” or “100% scale” and hit print
  3. Before cutting ensure that the 1” square box is correct
  4. Place pattern on top of fabric and cut 2 mirrored copies of the main piece, and 2 mirrored copies of the lining.

Completed Pieces:

After cutting, you should end up with a pile of pieces similar to the photos below (includes fabric ties option):


Assembly:

MAKING THE FABRIC TIES (skip if you are using elastic)
  1. Fold in one edge of a tie ½” and press.   
  2. Next, fold the piece in half lengthwise and press.  
  3. Using the pressed center as a guide, fold the outer raw edges in towards the center and press.  
  4. Finally, fold in half lengthwise again WRONG sides together.  
  5. Topstitch 1/8” from edge, completing a single tie. Repeat for the remaining 3 pieces and set aside.                                                            


SEWING THE MASK (skip to step 3 if you are not making a pocket)

  1. Finish middle of lining piece by serging or turning in ¼” and topstitching 1/8” from edge as shown                                                      
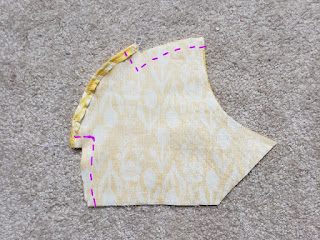
  2. Place lining pieces RIGHT side together, and sew along the outside of the curve, pivoting 90° roughly 3/8” in from the edge that you just finished, and sewing straight up towards the raw edge. Repeat on the other side. The two pieces should now be sewn together with a hole in the middle that will become your pocket.       
  3. Take your main pieces and place them RIGHT sides together. Sew along the outer curve as shown. (If you are NOT making the pocket repeat for the lining piece)  
  4. Flip sewn main and lining pieces right side out and pin RIGHT sides together. Sew along the top and bottom edges, as shown.            
  5. Insert one end of your longest piece of elastic or fabric tie into the side against the top seam, leaving roughly ¼” sticking out, with the free end facing the middle of the mask. Repeat on the opposite end for the bottom seam with your shorter piece of elastic (If you are using elastic, thread the other end of the elastic to the opposite side and pin in place). Sew entire side, making sure to backstitch over ties (IMPORTANT: IF YOU ARE NOT MAKING A POCKET MAKE SURE TO LEAVE A HOLE IN BETWEEN THE ELASTIC TIES FOR TURNING. YOU CAN CLOSE THIS HOLE LATER).   
  6. Elastic version- elastic is threaded from LEFT to RIGHT (elastic is designed to go AROUND the head, NOT the ears!)
      Ties version- ties are inserted into each corner
  7. Flip right side out, using the pocket hole (those making a pocket) or the side hole (those not making a pocket).                                    
  8. If you are inserting the nose piece, continue below. Otherwise skip to step 11
  9. Take your metal piece of choice and fold in roughly ½” on either side. 
  10. Measure 2” in from the top sides and mark. This will be your pivot point for making the optional nose piece.                                  
  11. Insert the folded metal piece into the mask via the pocket hole or side hole and center between the two points that were marked. Pin in place to hold.  Placement of nose piece (shown on outside of mask for reference)
  12. Starting at the top left of the mask, begin topstitching 1/8” away from the edge. When you get to your marked point, lift your presser foot and pivot. Sew roughly ½” down, and then pivot again. Continue sewing until you hit your second marked point, pivot, sew up ½”, pivot, and then continue topstitching all the way around until you hit your starting point. You are done!  
  13. To finish the mask without a nose piece, fold in the hole in the side of the mask roughly ½” in between the elastic. You will now topstitch 1/8” around the entire edge. You are done!


i

Saturday, September 22, 2018

Apple "Slice" Sugar Cookie Recipe and Tutorial!

DIY Apple Slice cookies: Recipe by Lindsey Krstic @linzhoo2u
I got inspiration for these cookies while trying to come up with a recipe to bring to my son's preschool class for "Apple Day". Other than apple pie, applesauce, and apple slices, there really wasn't anything I could think of to bring that was either child-friendly, nut-free or apple-related. So, after much thought I decided to get creative and make these apple slice cookies using ingredients that can be easily bought or made. I decided to be a bit "extra" and add some apple flavoring and cinnamon, but to be honest I don't think it made a difference to the kids as they were too excited about the cookies to notice. So, without further ado, I give you the tutorial for these adorable apple slice cookies, followed by a condensed recipe below:


Ingredients:
  • 2 tubes of sugar cookie dough of your choice, or roughly two batches of homemade sugar cookie dough
  • Bag of M&Ms in red, orange, yellow, brown, or green
  • Bag of pretzel sticks
  • Red and green food coloring
  • 5-6 drops Apple candy flavoring (optional)
  • 1/2 tsp ground cinnamon (optional)
  • Flour, as needed
Helpful Items to Have Out:
  • Large bowl + 2 smaller bowls for the dough
  • Cookie sheet
  • Parchment paper
  • Plastic wrap
  • Spoons for mixing
  • Sharp knife
  • Cutting board
  • Wire cooling rack
  • Oven mitts
Instructions:
To begin, preheat your oven to 325 and line a cookie sheet with parchment paper. 

Remove cookie dough from tubes and place in a large bowl. Remove roughly one-third of the dough and divide it equally between two smaller bowls. These will become the red and green outer layer. Using your food coloring, add enough drops into each small bowl to make a nice dark red and green color. If needed, add flour until dough becomes soft enough to roll, yet thick enough to stand up to being cut and handled.


In the large bowl, add apple flavoring and cinnamon (optional). Mix together and add additional flour if needed to make a thick dough.
Once dough is mixed, divide into 2 equal portions and roll into a thick tube that is roughly 1.5 inch in diameter. These will become the inner part of your cookies.


Remove one of the colored dough balls and roll out as thin as possible (no thicker than 1/4"). Trim edges to form a rectangle that is at least half the length of the tube you made in the previous step with enough of a width to wrap around the tube (mine was about 3.5"). Set aside and repeat for the second color.


Remove dough from freezer and place one tube on top of the colored dough. Using your fingers, very gently wrap the dough around the tube like a burrito. If it crumbles, don't worry!- just gently smooth the dough with your fingers until the colored portion completely cover the inside. Trim any excess. 


Wrap in plastic wrap and place to freezer to chill for a few minutes (5-10 roughly). Repeat for second color.


While dough is chilling, using a sharp knife gently cut each M&M candy in half and place in a small bowl. These will become your seeds.


Snap off about 1cm from each end of the pretzel sticks and place into another bowl. These will become your stems.


When dough has chilled briefly, remove from freezer and place on cutting board. Using a sharp knife, carefully slice the tubes width-wise about 1/4" thick. **It is important that the dough be chilled so that it can be sliced evenly.


Place slices on baking tray lined with parchment paper. Repeat for second color.


Using your fingers, shape each cookie into an apple shape by indenting at the top and bottom, and slightly pinching in the sides (see photo). 


Insert one piece of pretzel into the top of each cookie like a lollipop. You want the pretzel sticking in the cookie about half way for stability.


Place in oven and bake 11-13 minutes, checking on it about ten minutes in for doneness by inserting a toothpick into the center of the cookie and noting if there is any "wet" dough still sticking to the cookie.


When done, remove from oven and then immediately place two pieces of split M&Ms in the center of the cookie as shown. Allow to cool briefly, then transfer to a baking rack to cool.


That's it! Rejoice, because you are done! All that's left now is to place out on a cute plate and let the kiddos (or adults) enjoy. Thanks for reading! 

If you want to check out all the other things I do, feel free to follow me on Instagram @linzhoo2u or on pinterest at www.pinterest.com/linzhoo2u. Yes, it's an old nickname. Yes, I haven't changed it since college. Sorry. 


Apple "Slice" Cookies Recipe

By: Lindsey Krstic


Ingredients:
  • 2 tubes of sugar cookie dough of your choice, or roughly two batches of homemade sugar cookie dough
  • Bag of M&Ms in red, orange, yellow, brown, or green
  • Bag of pretzel sticks
  • Red and green food coloring
  • 5-6 drops Apple candy flavoring (optional)
  • 1/2 tsp ground cinnamon (optional)
  • Flour, as needed
Instructions:
  1. Preheat oven to 325 degrees and line a cookie sheet with parchment paper
  2. Remove cookie dough from tubes and place in a large bowl. Remove roughly one-third of the dough and divide it equally between two smaller bowls. These will become the red and green outer layer.
  3. Using your food coloring, add enough drops into each small bowl to make a nice dark red and green color. If needed, add flour until dough becomes soft enough to roll, yet thick enough to stand up to being cut and handled.
  4. In the large bowl, add apple flavoring and cinnamon (optional). Mix together and add additional flour if needed to make a thick dough.
  5. Once dough is mixed, divide dough into 2 equal portions and roll each into a thick tube that is roughly 1.5 inch in diameter. This will become the inner portion of your cookie.
  6. Remove one of the colored dough balls and roll out as thin as possible (no thicker than 1/4"). Trim edges to form a rectangle that is at least half the length of the tube you made in the previous step with enough of a width to wrap around the tube (mine was about 3.5"). Set aside and repeat for the second color.
  7. Place one tube on top of the colored dough and very gently wrap the dough around the tube like a burrito. Wrap in plastic wrap and place to freezer on a flat surface to chill for a few minutes (5-10 roughly). Repeat for second color.
  8. While dough is chilling, using a sharp knife gently cut each M&M candy in half and place in a small bowl. These will become your seeds.
  9. Snap off about 1cm from each end of the pretzel sticks and place into another bowl. These will become your stems.
  10. When finished, remove dough from freezer and place on cutting board. Using a sharp knife, carefully slice the tubes width-wise about 1/4" thick. Place slices on baking tray lined with parchment paper. Repeat for second color.
  11. Using your fingers, shape each cookie into an apple shape by indenting at the top and bottom, and slightly pinching in the sides (see photo). Insert one piece of pretzel into the top of each cookie like a lollipop. You want the pretzel sticking in the cookie about half way for stability.
  12. Place in oven and bake 11-13 minutes, checking on it about ten minutes in for doneness by inserting a toothpick into the center of the cookie and noting if there is any "wet" dough still sticking to the cookie.
  13. When done, remove from oven and then immediately place two pieces of split M&Ms in the center of the cookie as shown. Allow to cool briefly, then transfer to a baking rack to cool.


Thursday, January 29, 2015

Halloween Party Food and Decorations for Kids

Spooky Children's Halloween Party Crafts

childrens, halloween, party, crafts, kids, spooky, diy
The children's party table with ghostly juice boxes, bubbling witches' brew, favor bags, and costume contest prize and voting cards
It has been a while since I've been able to write a post- Having three children under 5 tends to take up a vast amount of my time. However, this past Halloween I was able to squeeze in a few moments to work on some crafts for a Halloween party I was throwing for some friends and their children. I worked on these crafts one at a time over the course of a week, so that when the big night arrived, I was not stressed at all. These crafts were all easy, cheap, and the kids and adults all loved them. 


Halloween, foyer, table, decoration, day, dead, night, spooky, hauntedFoyer Halloween Decorations:

Let's start with some decorations. For the entrance table, I was able to reuse some cheap decorations I purchased at the Dollar Store to create an eerie entrance table that wasn't too scary for the kids. The candles are LED so they don't pose a fire hazard and as a bonus they have a built in timer that turns them on and off at the same time every day.  

The second picture is my absolute favorite DIY decoration that reminds me of the floating candle hall in the Harry Potter movie. It took me less than an hour to complete and the total cost was under $20. The end result was incredible, and these pictures just don't do it justice. 

floating, candle, ceiling, halloween, party, kids, diy, cheap, harry, potterFloating Candle Decoration:
Materials:
floating, candle, ceiling, harry, potter, sky, halloween, cheap, diy
  • Sheer black curtain (Big Lots, $5)
  • 24 flameless votive candles (2- 12 packs at Big Lots were $6 each)
  • Fishing Wire
  • 6 thumbtacks
Standing on a chair, I attached the curtain to the ceiling with the thumbtacks, placing one tack on each corner and the remaining two on either side of the long end.  I then cut a long piece of fishing wire and attached it from one end of the tack to another, creating the shape of a rectangle with an X- shape on the inside. Next, I looped a piece of fishing wire around the bottom of the votives, tyeing a knot at the top of the flame to secure it to the string. Using the two free ends of the fishing wire, I tied each votive to the fishing wire frame on the ceiling, making each one a different height for interest. That was it! When night came, I simply reached up and turned each one one and the effect was stunning. The light of the candles were enough to give the room a soft glow, and the black curtain on the ceiling made it appear as if the candles were floating in the sky. I am definitely doing this next year.


The kid's party food and decorations were a lot of fun, were cheap, and so so easy. 

Smoking Cauldron Punch:
Materials:
  • Black punch bowl (Walmart, $1)
  • Punch Recipe (I used a combination of fruit punch, orange, pineapple, and apple juice but you can use any red-colored punch)
  • Ice cubes
  • Dry ice (found in the front of most grocery stores. You will need at least a pound. Bring a thick cooler to store on the ride home)
The smoking cauldron was super easy and added a dramatic effect to the children's party table. After adding the punch and ice to the bowl, I then occasionally tossed in a few small chunks of dry ice. The dry ice was so neat because not only did it give the cauldron a smoking effect but it also created bubbles and large balls of ice as the dry ice froze its own bubbles. A word of advice on the dry ice, though: please use gloves or an oven mitt when handling and instruct kids not to pick it up as it is very cold and will burn. 

Ghostly Halloween Party Juice Boxes:
Materials:

    halloween, party, kids, ghostly, juice, boxes, diy, craft, easy, cheap, ghost
  • Barrel juice boxes ($4 for a box of 16)
  • White duck tape (found in the paint section at Walmart, $4)
  • Black sharpie ($2)
  • Black pipe cleaners ($1)
  • An assortment of googly eyes ($1, in most craft sections)
  • Glue gun and glue sticks

 The kids loved these juice boxes. To make, simply wrap the white tape around the juice box, glue on eyes, draw an oval-shaped mouth, and wrap a pipe clear around the top, bending it on each side to form wavy arms. For added fun, I wrapped one end of the pipe cleaner around the straw that came with the juice boxes. They were almost too cute as some of the kids ended up taking their home instead of drinking them.

Graveyard Pudding Cups:
Materials:

  • Instant chocolate pudding
  • Milk
  • Box of Oreo cookies
  • Ghost Peeps and/or tombstone cupcake decorations (found seasonally at Walmart or craft stores in the halloween section)
  • Tiny bone cupcake sprinkles (in seasonal halloween or baking section)
  • Clear plastic drinking cups
  • Tiny black spoons (also found in halloween section or at most party stores)
All you need to do is prepare the pudding and pour into cups. Crush the oreos by placing in a bag and whacking with a meat tenderizer or rolling over it with a rolling pink. Plop a ghost on top and you're done. The pudding can be prepared in advance and added to the cups before the event. 


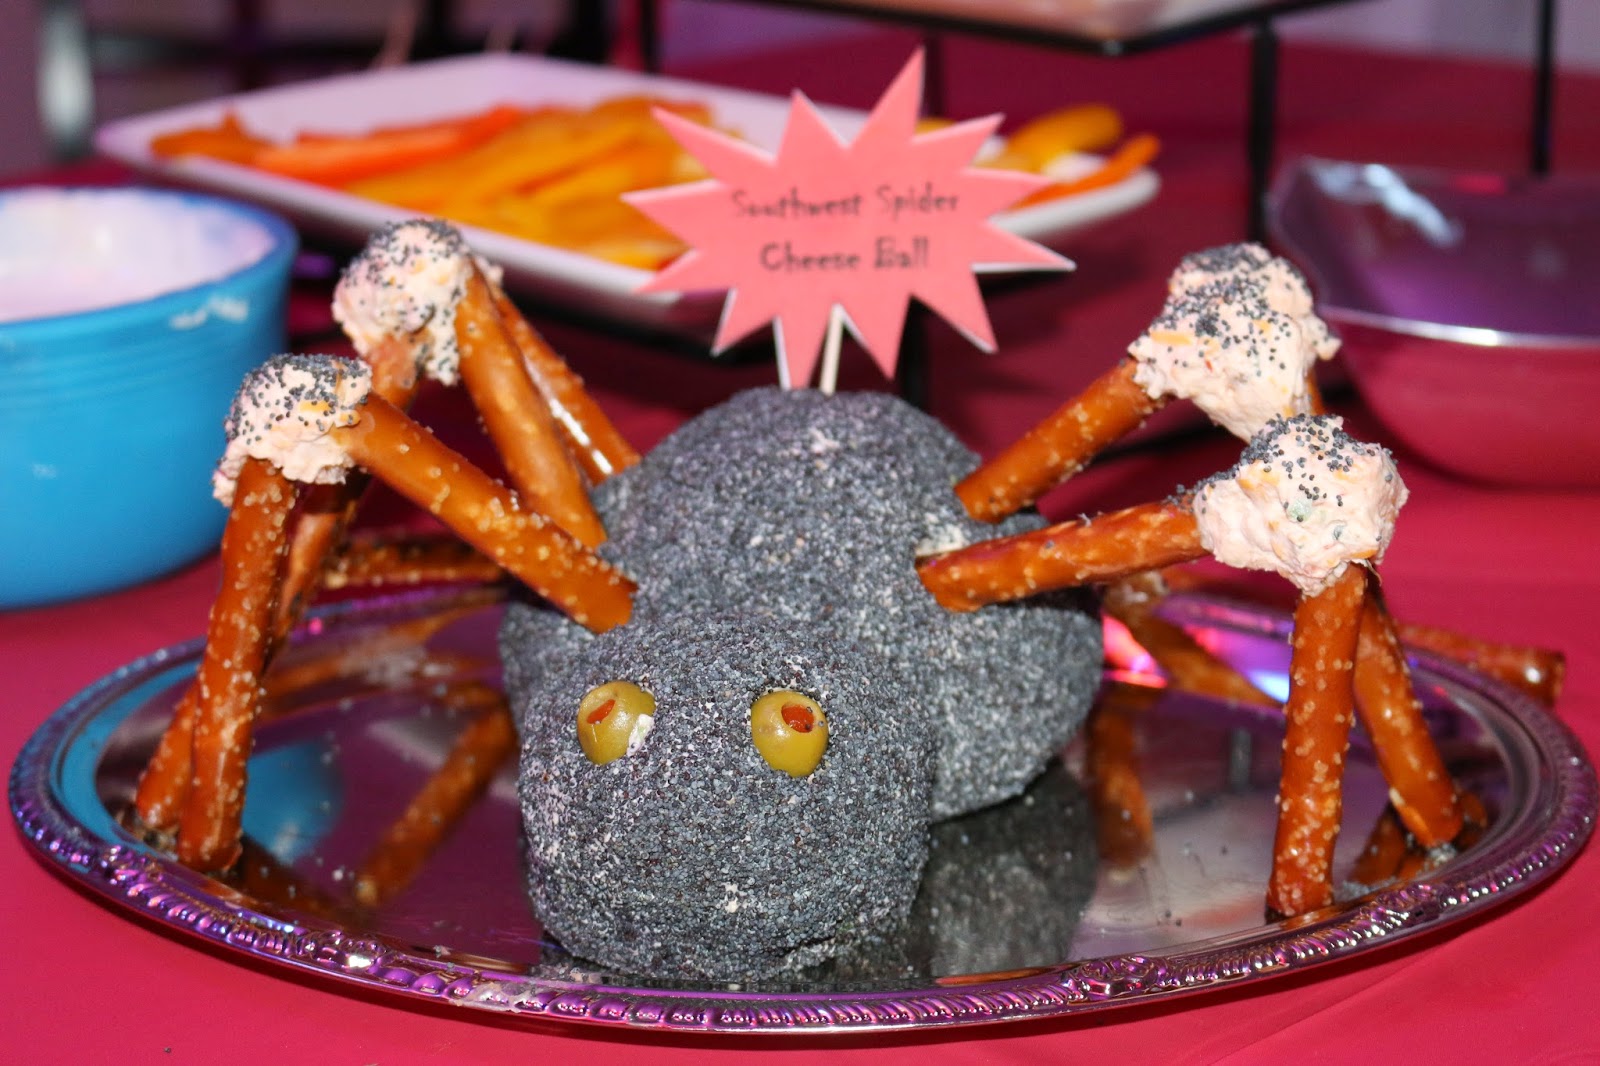
Southwest Spider Cheese Ball: (recipe found here)

southwest, spider, cheese, ball, kids, halloween, party, cheap, dyThis is the second time that I have made this cheese ball because it is so easy, cheap, looks so spooky, and tastes great. It can be prepared in advanced, with only some last minute work. The time it took me to prepare the cheese ball and complete the look took me less than 15 minutes total. It was ridiculously easy and the guests loved how creepy it looked on the party table. Follow the link above for the recipe.


Monster Ham and Swiss Sandwiches:
Years ago, a friend gave me a recipe for these awesome party sandwiches that I have since seen almost everywhere online. And for good reason. They are really good and easy to prepare for a party. At this Halloween party they were gone within minutes.


Materials: (makes 12 mini sandwiches)

  • 2 pounds of good quality ham, shaved or thin-sliced
  • 2 packs of swiss cheese (about a pound)
  • 1 cup of butter (2 sticks)
  • 1 1/2 Tablespoons Dijon mustard
  • 1 1/2 Tablespoons Worchestershire sauce
  • 1 Tablespoon poppy seeds
  • 1 teaspoon onion powder (optional)
  • Toothpicks
  • Googly eyes
  • Glue gun 
Prepare the toothpicks in advance by gluing the googly eyes onto the flat end of a toothpick. Store in a plastic baggie until ready to use. The day before the event, melt butter and mix in dijon, worchestershire sauce, and poppy seeds. Slice the bread rolls in half as if making a sandwich, trying to keep the rolls together as a single unit. Divide the ham amongst the bottom half, then layer the swiss cheese on top. Replace the top of the rolls, and drizzle the butter mixture over top. Refrigerate overnight. When ready, preheat oven to 350 and bake for 15 minutes. Separate the sandwiches and serve warm. Recipe can be doubled, tripled, or tailored to however you need. I doubled the recipe for my party and there were no leftovers. 

Vampire's Blood Drink: (alcoholic)
vampire, cocktail, blood, halloween, adult, drinks, syringe, smoking, party, easyI had to include this party drink, as it was visually striking and was a huge hit for the adults at the party. I used the recipe as was written in the original post which included (a lot of) alcohol, but the author also mentioned that this could be made kid-friendly simply by omitting the alcohol. Here is the original recipe for Vampire Cocktail. Below are pictures of the end result. The drink came out pretty strong by itself, but when the raspberry "shots' were added it balanced it out well.  For added effect, I used some of the ice I bought for the smoking cauldron punch (above) to make the cups appear as if they were smoking. The syringes can either be bought at a party store or ordered online through medical sites for a more realistic effect. They can be rinsed and reused for another time. I bought a cheap silver platter at the Dollar store, laid a paper towel over top, and let some of the syrup drip onto the paper towel, making it look like a creepy medical tray. To save on time, I combined all of the ingredients into a large glass container and stored in the refrigerator. The syringes were also prepared ahead of time, capped, and place in the fridge. So all you have to do at the party is fill the cups with ice, pour in the drink, and let your guests select a syringe. This is a terrific Halloween party cocktail!


<a href="//www.brandbacker.com" target="_blank"><img src="//images.brandbacker.com/badges/no_badge.png" title="BrandBacker Member" alt="BrandBacker Member"></a>