FREE EASY ADULT FITTED FACE MASK WITH FILTER POCKET
This post contains a free easy pattern and instructions with photos to make a 2-layer fitted face mask with a filter pocket. It is designed by a nurse to be used both with and without an N95 or surgical mask. Click here for a FREE children's face mask pattern!

**DISCLAIMER: This is NOT a tested medical device, but in light of the recent CDC recommendations to use a bandana or scarf if there is nothing else this may be better than nothing. I make no warranties or claims as to the effectiveness of this mask so proceed at your own risk**
NOTE: I do not believe these masks are equivalent to N95 respirators that can filter out the tiniest of particles, but I do believe that wearing them while sick can help “cover a cough” so to speak or potentially help extend the life of a medical mask when worn over top. The CDC is now recommending everyone wear masks in public. Please reserve the medical masks for healthcare professionals.
Fitting the mask: The goal of this mask is to create the best seal possible around the nose, up the sides of the cheek, and under the chin, in order to prevent as much unfiltered air as possible from entering any open spaces in the mask. To do this, when putting on the mask make sure it covers the nose- use the metal piece to create a tight seal around the bridge of the nose, then bring the mask under the chin. The sides of the mask should be positioned so that the elastic lays just above and below the ears, reducing pressure on them.
Materials Needed:
NOTE: SEAM ALLOWANCE IS 3/8”!
- TIES OR ELASTIC
- Fabric Ties: Four pieces of 2”x20” fabric
- Elastic Ties: (recommended ¼” or 3/8” width)
- Women (or small/medium head): x1 piece of 13” elastic and x 1 piece 10” elastic
- Men (or larger head): x1 piece of 15” elastic and x1 piece of 12” elastic
- Fabric for outer piece and lining (FABRIC SUGGESTIONS: Batik or other tightly woven cotton, cotton/polyester woven blends (what scrubs are made from), or optional additional water-resistant breathable fabric for liner (such as Ottertex or Goretex). Preferably two contrasting colors. Wash warm/hot daily and use sanitizing cycle if available.
- 6” of twist ties (good), pipe cleaner (better), or flat jewelry wire (best)
- Optional filter material: 4”x5” piece of 100% polypropylene fabric (cut 5 pieces, label #1-5 and rotate daily- this is because viruses can live on surfaces for several days. Wash daily after use in COLD water with soap and water, and air dry. Can double amount of polypropylene if it doesn’t interfere with breathability.)
- Fabric Ties: Four pieces of 2”x20” fabric
- Elastic Ties: (recommended ¼” or 3/8” width)
- Women (or small/medium head): x1 piece of 13” elastic and x 1 piece 10” elastic
- Men (or larger head): x1 piece of 15” elastic and x1 piece of 12” elastic
PRINTING AND CUTTING:
Note: if you are NOT making a pocket, follow the directions below and simply cut 2 mirrored sets (4 pieces total) of the main piece.
Instructions for cutting using Cricut Design Space: .svg file for using with Cricut can be found here (dropbox file): Cricut SVG file
- Create a new project
- Click “Upload”, then “upload image”
- Select “browse”, then locate file called “Fittedfacemaskwithpocket-Cricut.svg” on hard drive (.svg files work best)
- Choose a name for your file and keywords, if desired. Click “Save”
- Select your image, and then click “insert images”
- THIS STEP IS VERY IMPORTANT. While the entire group is still selected, change the width to exactly 23.250 inches making sure the lock is on to maintain scale. This will resize the cut pieces to the proper height which is EXTREMELY important for the perfect fit. Also, adjust position on x and y axis to 1 to place the grouped images into the viewing field.
- You can now delete the optional fabric ties pieces if desired (the lavender rectangles- a 24” mat is required to cut these)
- Click “make it”, adjust mat size if needed, then click “continue”.
- The pieces are sorted by color according to material. Using your fabric grip mat, follow instructions to cut out the pieces for your main and lining pieces.
- Load your mat, and click the flashing Cricut button.
Instructions for printing and cutting: Pattern is located at the end of this post. If you have trouble downloading the images from the site, they may also be found here (dropbox folder)
- Select images and click, "print". You may alternatively save images to your computer and print from there.
- Make sure your printer properties are set to “actual size” or “100% scale” and hit print
- Before cutting ensure that the 1” square box is correct
- Place pattern on top of fabric and cut 2 mirrored copies of the main piece, and 2 mirrored copies of the lining.
Completed Pieces:
After cutting, you should end up with a pile of pieces similar to the photos below (includes fabric ties option):

Assembly:
MAKING THE FABRIC TIES (skip if you are using elastic)
- Fold in one edge of a tie ½” and press.

- Next, fold the piece in half lengthwise and press.

- Using the pressed center as a guide, fold the outer raw edges in towards the center and press.

- Finally, fold in half lengthwise again WRONG sides together.


- Topstitch 1/8” from edge, completing a single tie. Repeat for the remaining 3 pieces and set aside.


SEWING THE MASK (skip to step 3 if you are not making a pocket)
- Finish middle of lining piece by serging or turning in ¼” and topstitching 1/8” from edge as shown

- Place lining pieces RIGHT side together, and sew along the outside of the curve, pivoting 90° roughly 3/8” in from the edge that you just finished, and sewing straight up towards the raw edge. Repeat on the other side. The two pieces should now be sewn together with a hole in the middle that will become your pocket.


- Take your main pieces and place them RIGHT sides together. Sew along the outer curve as shown. (If you are NOT making the pocket repeat for the lining piece)

- Flip sewn main and lining pieces right side out and pin RIGHT sides together. Sew along the top and bottom edges, as shown.

- Insert one end of your longest piece of elastic or fabric tie into the side against the top seam, leaving roughly ¼” sticking out, with the free end facing the middle of the mask. Repeat on the opposite end for the bottom seam with your shorter piece of elastic (If you are using elastic, thread the other end of the elastic to the opposite side and pin in place). Sew entire side, making sure to backstitch over ties (IMPORTANT: IF YOU ARE NOT MAKING A POCKET MAKE SURE TO LEAVE A HOLE IN BETWEEN THE ELASTIC TIES FOR TURNING. YOU CAN CLOSE THIS HOLE LATER).
- Flip right side out, using the pocket hole (those making a pocket) or the side hole (those not making a pocket).

- If you are inserting the nose piece, continue below. Otherwise skip to step 11
- Take your metal piece of choice and fold in roughly ½” on either side.

- Measure 2” in from the top sides and mark. This will be your pivot point for making the optional nose piece.

- Insert the folded metal piece into the mask via the pocket hole or side hole and center between the two points that were marked. Pin in place to hold.
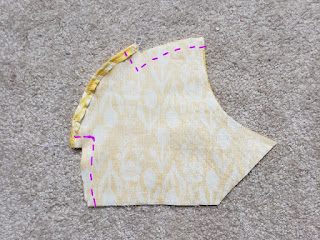
 Placement of nose piece (shown on outside of mask for reference)
 - Starting at the top left of the mask, begin topstitching 1/8” away from the edge. When you get to your marked point, lift your presser foot and pivot. Sew roughly ½” down, and then pivot again. Continue sewing until you hit your second marked point, pivot, sew up ½”, pivot, and then continue topstitching all the way around until you hit your starting point. You are done!


- To finish the mask without a nose piece, fold in the hole in the side of the mask roughly ½” in between the elastic. You will now topstitch 1/8” around the entire edge. You are done!


 | ||
Elastic version- elastic is threaded from LEFT to RIGHT (elastic is designed to go AROUND the head, NOT the ears!)
|


No comments:
Post a Comment